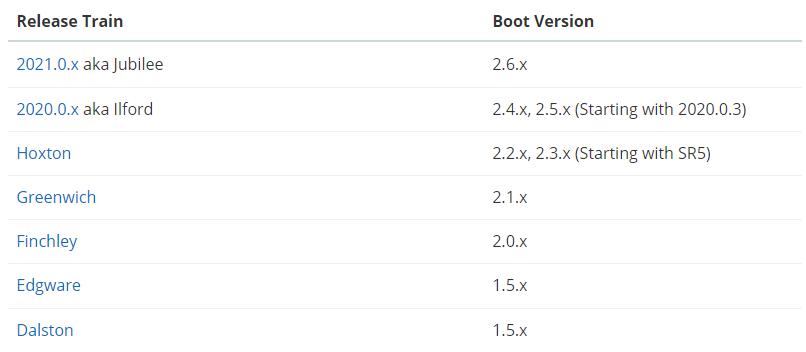
一、概述 1.1 SpringCloud与Springboot版本约束 SpringCloud官网
1.2 环境搭建 1.2.1 创建Maven工程 先创建一个Maven工程,选择好对应的模板后,修改文件名最后完成工程项目创建
为简化项目结构,使一些不重要的配置文件不显示出来,可以再setting->Editor中进行一下配置:
1.2.2 父工程pom文件 1 2 3 4 5 6 7 8 9 10 11 12 13 14 15 16 17 18 19 20 21 22 23 24 25 26 27 28 29 30 31 32 33 34 35 36 37 38 39 40 41 42 43 44 45 46 47 48 49 50 51 52 53 54 55 56 57 58 59 60 61 62 63 64 65 66 67 68 69 70 71 72 73 74 75 76 77 78 79 80 81 82 83 84 85 86 87 88 89 90 91 92 93 94 95 96 97 98 99 100 101 102 103 104 105 106 107 108 109 110 111 112 113 114 115 116 117 118 119 120 121 122 123 124 125 126 127 128 129 130 131 132 <?xml version="1.0" encoding="UTF-8"?> <project xmlns ="http://maven.apache.org/POM/4.0.0" xmlns:xsi ="http://www.w3.org/2001/XMLSchema-instance" xsi:schemaLocation ="http://maven.apache.org/POM/4.0.0 http://maven.apache.org/xsd/maven-4.0.0.xsd" > <modelVersion > 4.0.0</modelVersion > <groupId > org.example</groupId > <artifactId > cloud2022</artifactId > <version > 1.0-SNAPSHOT</version > <modules > <module > cloud-provider-payment8001</module > </modules > <packaging > pom</packaging > <properties > <java.version > 1.8</java.version > <project.build.sourceEncoding > UTF-8</project.build.sourceEncoding > <maven.compiler.source > 12</maven.compiler.source > <maven.compiler.target > 12</maven.compiler.target > <junit.version > 4.13.2</junit.version > <lombok.version > 1.18.24</lombok.version > <log4j.version > 1.2.17</log4j.version > <mysql.version > 8.0.29</mysql.version > <druid.version > 1.2.11</druid.version > <mybatis.spring.boot.version > 2.2.2</mybatis.spring.boot.version > </properties > <dependencyManagement > <dependencies > <dependency > <groupId > org.apache.maven.plugins</groupId > <artifactId > maven-project-info-reports-plugin</artifactId > <version > 3.0.0</version > </dependency > <dependency > <groupId > org.springframework.boot</groupId > <artifactId > spring-boot-dependencies</artifactId > <version > 2.6.8</version > <type > pom</type > <scope > import</scope > </dependency > <dependency > <groupId > org.springframework.cloud</groupId > <artifactId > spring-cloud-dependencies</artifactId > <version > 2021.0.3</version > <type > pom</type > <scope > import</scope > </dependency > <dependency > <groupId > com.alibaba.cloud</groupId > <artifactId > spring-cloud-alibaba-dependencies</artifactId > <version > 2021.1</version > <type > pom</type > <scope > import</scope > </dependency > <dependency > <groupId > mysql</groupId > <artifactId > mysql-connector-java</artifactId > <version > $ {mysql.version} </version > <scope > runtime</scope > </dependency > <dependency > <groupId > com.alibaba</groupId > <artifactId > druid</artifactId > <version > $ {druid.version} </version > </dependency > <dependency > <groupId > org.mybatis.spring.boot</groupId > <artifactId > mybatis-spring-boot-starter</artifactId > <version > $ {mybatis.spring.boot.version} </version > </dependency > <dependency > <groupId > junit</groupId > <artifactId > junit</artifactId > <version > $ {junit.version} </version > </dependency > <dependency > <groupId > log4j</groupId > <artifactId > log4j</artifactId > <version > $ {log4j.version} </version > </dependency > <dependency > <groupId > org.projectlombok</groupId > <artifactId > lombok</artifactId > <version > $ {lombok.version} </version > <scope > provided</scope > </dependency > <dependency > <groupId > com.alibaba</groupId > <artifactId > druid-spring-boot-starter</artifactId > <version > $ {druid.version} </version > </dependency > </dependencies > </dependencyManagement > <build > <plugins > <plugin > <groupId > org.springframework.boot</groupId > <artifactId > spring-boot-maven-plugin</artifactId > <configuration > <fork > true</fork > <addResources > true</addResources > <excludes > <exclude > <groupId > org.projectlombok</groupId > <artifactId > lombok</artifactId > </exclude > </excludes > </configuration > </plugin > </plugins > </build > </project >
1.2.3 构建子模块 右击父工程创建一个maven子模块(不需要用maven模板创建)
子模块的pom文件如下:
1
2
3
4
5
6
7
8
9
10
11
12
13
14
15
16
17
18
19
20
21
22
23
24
25
26
27
28
29
30
31
32
33
34
35
36
37
38
39
40
41
42
43
44
45
46
47
48
49
50
51
52
53
54
55
56
57
58
59
60
61
62
63
64
65
66
<?xml version="1.0" encoding="UTF-8"?> <project xmlns ="http://maven.apache.org/POM/4.0.0" xmlns:xsi ="http://www.w3.org/2001/XMLSchema-instance" xsi:schemaLocation ="http://maven.apache.org/POM/4.0.0 http://maven.apache.org/xsd/maven-4.0.0.xsd" > <parent > <artifactId > cloud2022</artifactId > <groupId > org.example</groupId > <version > 1.0-SNAPSHOT</version > </parent > <modelVersion > 4.0.0</modelVersion > <artifactId > cloud-provider-payment8001</artifactId > <dependencies > <dependency > <groupId > org.springframework.boot</groupId > <artifactId > spring-boot-starter-web</artifactId > </dependency > <dependency > <groupId > org.springframework.boot</groupId > <artifactId > spring-boot-starter-actuator</artifactId > </dependency > <dependency > <groupId > org.mybatis.spring.boot</groupId > <artifactId > mybatis-spring-boot-starter</artifactId > </dependency > <dependency > <groupId > com.alibaba</groupId > <artifactId > druid-spring-boot-starter</artifactId > </dependency > <dependency > <groupId > mysql</groupId > <artifactId > mysql-connector-java</artifactId > </dependency > <dependency > <groupId > org.springframework.boot</groupId > <artifactId > spring-boot-starter-jdbc</artifactId > </dependency > <dependency > <groupId > org.projectlombok</groupId > <artifactId > lombok</artifactId > <scope > provided</scope > </dependency > <dependency > <groupId > org.springframework.boot</groupId > <artifactId > spring-boot-starter-test</artifactId > <scope > test</scope > </dependency > </dependencies > </project >
pom文件配置好后,再在子模块中创建springboot的配置文件application.yml
yml配置内容如下:
1
2
3
4
5
6
7
8
9
10
11
12
13
14
15
16
17
18
server: port: 8001 servlet: context-path: / spring: datasource: type: com.alibaba.druid.pool.DruidDataSource url: jdbc:mysql://localhost:3306/personalsystem?useUnicode=true&characterEncoding=utf8&allowMultiQueries=true&serverTimezone=GMT%2B8&useSSL=false username: root password: FLzxSQC1998.Com driver-class-name: com.mysql.cj.jdbc.Driver mybatis: type-aliases-package: com.company.bufan.pojo mapper-locations: classpath:mapper/*.xml configuration: map-underscore-to-camel-case: true log-impl: org.apache.ibatis.logging.stdout.StdOutImpl
配置文件的问题解决完了,接下来就可以创建Springboot的主启动类了,代码如下:
1
2
3
4
5
6
7
8
9
10
11
12
package com.atguigu.springcloud;import org.springframework.boot.SpringApplication;import org.springframework.boot.autoconfigure.SpringBootApplication;@SpringBootApplication public class PaymentMain8001 public static void main (String[] args) SpringApplication.run(PaymentMain8001.class,args); } }
1.2.4 注意事项 要注意该maven的Java启动版本,不然会报错,如下:
遇到此问题需要进行以下修改:Setting->Build,Execution,Deployment->Compiler->Java Compiler
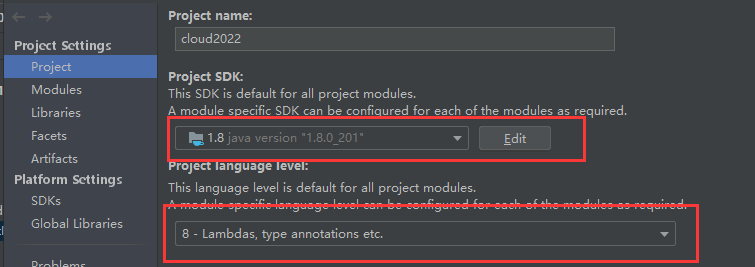
此外,还需要检查下项目的File->Project Structure,看项目的Java版本是否正确
检查完成之后,应该就不会报Java版本的错误了
1.2.5 热部署 为避免每次修改代码都要手动重启项目,启动热部署可以在修改代码后自动重启项目
在子模块中添加以下依赖:
1 2 3 4 5 6 7 <dependency > <groupId > org.springframework.boot</groupId > <artifactId > spring-boot-devtools</artifactId > <scope > runtime</scope > <optional > true</optional > </dependency >
添加以下配置:
再ctrl+alt+shift+/,进入Registry,启动项目两个选项
最后重启IDEA即可
二、支付模块构建 此支付模块用于记录消费者的支付记录,模块代码同一般的Springboot项目,即:
controller
mapper
pojo
service/service.impl
2.1 配置文件 2.1.1 yml配置 1 2 3 4 5 6 7 8 9 10 11 12 13 14 15 16 17 18 server: port: 8001 servlet: context-path: / spring: datasource: type: com.alibaba.druid.pool.DruidDataSource url: jdbc:mysql://localhost:3306/learn?useUnicode=true&characterEncoding=utf8&allowMultiQueries=true&serverTimezone=GMT%2B8&useSSL=false username: root password: FLzxSQC1998.Com driver-class-name: com.mysql.cj.jdbc.Driver mybatis: type-aliases-package: com.atguigu.springcloud.pojo mapper-locations: classpath:mapper/*.xml configuration: map-underscore-to-camel-case: true log-impl: org.apache.ibatis.logging.stdout.StdOutImpl
2.1.2 mapper配置 1 2 3 4 5 6 7 8 9 10 11 12 13 14 15 16 17 18 19 20 21 22 23 24 <?xml version="1.0" encoding="UTF-8" ?> <!DOCTYPE mapper PUBLIC "-//mybatis.org//DTD Mapper 3.0//EN" "http://mybatis.org/dtd/mybatis-3-mapper.dtd" > <mapper namespace ="com.atguigu.springcloud.mapper.PaymentMapper" > <resultMap id ="BaseResultMap" type ="com.atguigu.springcloud.pojo.Payment" > <id column ="id" property ="id" jdbcType ="BIGINT" /> <id column ="serial" property ="serial" jdbcType ="VARCHAR" /> </resultMap > <select id ="getPaymentById" resultType ="payment" parameterType ="Long" resultMap ="BaseResultMap" > SELECT * FROM learn.payment WHERE id = #{id}; </select > <insert id ="addPayment" parameterType ="payment" useGeneratedKeys ="true" keyProperty ="id" > INSERT INTO learn.payment(serial) VALUE (#{serial}); </insert > </mapper >
2.2 controller 1 2 3 4 5 6 7 8 9 10 11 12 13 14 15 16 17 18 19 20 21 22 23 24 25 26 27 28 29 30 31 32 33 34 35 36 37 38 39 40 41 package com.atguigu.springcloud.controller;import com.atguigu.springcloud.pojo.CommentResult;import com.atguigu.springcloud.pojo.Payment;import com.atguigu.springcloud.service.PaymentService;import lombok.extern.slf4j.Slf4j;import org.springframework.web.bind.annotation.GetMapping;import org.springframework.web.bind.annotation.PathVariable;import org.springframework.web.bind.annotation.PostMapping;import org.springframework.web.bind.annotation.RestController;import javax.annotation.Resource;@RestController @Slf4j public class PaymentController @Resource private PaymentService paymentService; @PostMapping("/payment/create") public CommentResult create (Payment payment) int res = paymentService.addPayment(payment); if (res > 0 ){ return new CommentResult(res,200 ,"success" ); } else { return new CommentResult(null ,444 ,"fail" ); } } @GetMapping("/payment/get/{id}") public CommentResult<Payment> getPaymentById (@PathVariable("id") Long id) Payment payment = paymentService.getPayment(id); if (payment != null ){ return new CommentResult(payment,200 ,"success" ); }else { return new CommentResult(null ,444 ,"fail" ); } } }
三、消费者订单模块构建 消费者模块用于调用支付模块服务请求,在spring框架中有RestTemplate 框架用于调用服务请求
消费者服务架构如下:
注 :此模块不需要数据库的依赖包 ,需要在pom中去除这些数据库依赖包,否则会报错
3.1 config 1 2 3 4 5 6 7 8 9 10 11 12 13 14 package com.atguigu.springcloud.config;import org.springframework.context.annotation.Bean;import org.springframework.context.annotation.Configuration;import org.springframework.web.client.RestTemplate;@Configuration public class ApplicationContextConfig @Bean public RestTemplate getRestTemplate () return new RestTemplate(); } }
3.2 controller 1 2 3 4 5 6 7 8 9 10 11 12 13 14 15 16 17 18 19 20 21 22 23 24 25 26 27 28 29 30 31 32 package com.atguigu.springcloud.controller;import com.atguigu.springcloud.pojo.CommentResult;import com.atguigu.springcloud.pojo.Payment;import lombok.extern.slf4j.Slf4j;import org.springframework.web.bind.annotation.GetMapping;import org.springframework.web.bind.annotation.PathVariable;import org.springframework.web.bind.annotation.PostMapping;import org.springframework.web.bind.annotation.RestController;import org.springframework.web.client.RestTemplate;import javax.annotation.Resource;@RestController @Slf4j public class OrderController private static final String PAYMENT_URL = "http://localhost:8001" ; @Resource private RestTemplate restTemplate; @PostMapping("/consumer/payment/create") public CommentResult create (Payment payment) return restTemplate.postForObject(PAYMENT_URL+"/payment/create" ,payment,CommentResult.class); } @GetMapping("/consumer/payment/get/{id}") public CommentResult getPaymentById (@PathVariable("id") Long id) return restTemplate.getForObject(PAYMENT_URL+"/payment/get/" +id,CommentResult.class); } }
3.3 pojo pojo层直接复制支付模块的pojo层即可
3.4 其他配置 配置完成后运行即可,在idea下方有Services窗口,可以管理所有的服务模块:
四、工程重构 4.1 公共Maven模块 观察上述项目结构,两个服务在pojo部分存在相同的代码,因此可以提取这些代码,将其放到一个新的公共的maven模块中,其他服务模块可以在pom中引入这个maven项目即可
公共maven模块的依赖包:
1 2 3 4 5 6 7 8 9 10 11 12 13 14 15 16 17 18 19 20 21 <dependencies > <dependency > <groupId > org.springframework.boot</groupId > <artifactId > spring-boot-devtools</artifactId > <scope > runtime</scope > <optional > true</optional > </dependency > <dependency > <groupId > org.projectlombok</groupId > <artifactId > lombok</artifactId > <scope > provided</scope > <optional > true</optional > </dependency > <dependency > <groupId > cn.hutool</groupId > <artifactId > hutool-all</artifactId > <version > 5.8.4</version > </dependency > </dependencies >
复制pojo到公共的Maven模块中,注意包地址要保持一致
复制完成后->Maven clean/install打包公共模块->其他模块即可引入此依赖包:
1 2 3 4 5 6 7 <dependency > <groupId > com.atguigu.springcloud</groupId > <artifactId > cloud-api-commons</artifactId > <version > ${project.version}</version > </dependency >


