一、容器
1.1 介绍
- 数组本身是一种容器,劣势是不灵活,长度固定,方法有限,只能存储有序、可重复的数据
- 容器:在Java当中,如果有一个类专门用来存放其它类的对象,这个类就叫做容器,或者就叫做集合,集合就是将若干性质相同或相近的类对象组合在一起而形成的一个整体

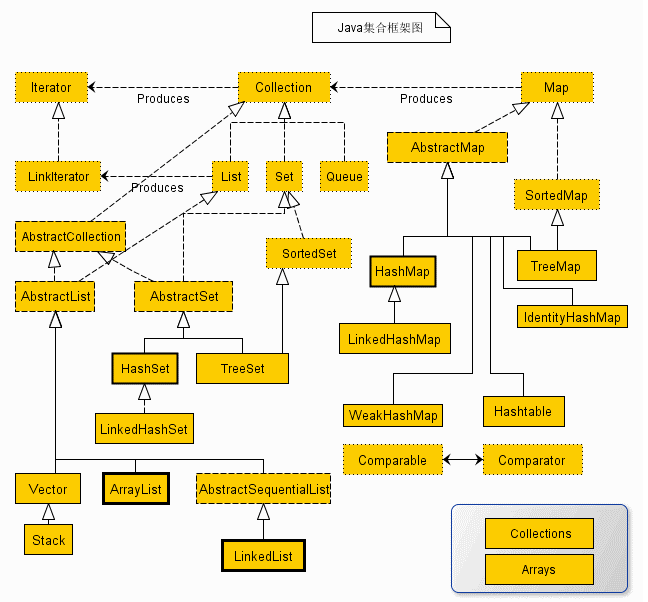
- 从上面的集合框架图可以看到,Java 集合框架主要包括两种类型的容器,一种是集合(Collection),存储一个元素集合,另一种是图(Map),存储键/值对映射。Collection 接口又有 3 种子类型,List、Set 和 Queue,再下面是一些抽象类,最后是具体实现类,常用的有 ArrayList、LinkedList、HashSet、LinkedHashSet、HashMap、LinkedHashMap 等等
1.2 接口方法
1.2.1 Collection
以下方法都是见名知意,就不做解释了
| 方法 |
|---|
| size():int |
| isEmpty():boolean |
| contains(Object): |
| iterator():iterator\ |
| toArray():Object[] |
| add(E):boolean |
| remove(Object):boolean |
| containsAll(Collection<?>):boolean |
| addAll(Collection<? extends E>):boolean |
| removeAll(Collection<?>):boolean |
| clear():void |
1.2.2 Map
- 以下方法都是见名知意,就不做解释了
| 方法 |
|---|
| size():int |
| isEmpty():boolean |
| containsKey(Object):boolean |
| containsValue(Object):boolean |
| get(Object):V |
| put(K,V):V |
| remove(Object):V |
| putAll(Map<? extends K,?extends V>):void |
| clear():void |
| ketSet():Set\ |
| values():Collection\ |
| equals(Object):boolean |
二、泛型
2.1 基础
- 将数据类型作为参数,进行变量的声明
1 | // <>,可以用T,E,V表示,代表需要接受的数据类型的参数 |
2.2 泛型方法
1 | public class GenericMethodTest |
2.2.1 有界的类型参数
可能有时候,你会想限制那些被允许传递到一个类型参数的类型种类范围。例如,一个操作数字的方法可能只希望接受Number或者Number子类的实例。这就是有界类型参数的目的。
要声明一个有界的类型参数,首先列出类型参数的名称,后跟extends关键字,最后紧跟它的上界。
1
2
3
4
5
6
7
8
9
10
11
12
13
14
15
16
17
18
19
20
21
22
23
24
25
26
27
28
29
30
31
32
33
34public class MaximumTest
{
// 比较三个值并返回最大值
public static <T extends Comparable<T>> T maximum(T x, T y, T z)
{
T max = x; // 假设x是初始最大值
if ( y.compareTo( max ) > 0 ){
max = y; //y 更大
}
if ( z.compareTo( max ) > 0 ){
max = z; // 现在 z 更大
}
return max; // 返回最大对象
}
public static void main( String args[] )
{
System.out.printf( "%d, %d 和 %d 中最大的数为 %d\n\n",
3, 4, 5, maximum( 3, 4, 5 ) );
System.out.printf( "%.1f, %.1f 和 %.1f 中最大的数为 %.1f\n\n",
6.6, 8.8, 7.7, maximum( 6.6, 8.8, 7.7 ) );
System.out.printf( "%s, %s 和 %s 中最大的数为 %s\n","pear",
"apple", "orange", maximum( "pear", "apple", "orange" ) );
}
}
/*Output:
3, 4 和 5 中最大的数为 5
6.6, 8.8 和 7.7 中最大的数为 8.8
pear, apple 和 orange 中最大的数为 pear
*/
2.3 泛型类
1 | public class Box<T> { |
2.4 类通配符
1 | import java.util.*; |
- 类型通配符上限通过形如List来定义,如此定义就是通配符泛型值接受Number及其下层子类类型。
在(//1)处会出现错误,因为getUperNumber()方法中的参数已经限定了参数泛型上限为Number,所以泛型为String是不在这个范围之内,所以会报错
类型通配符下限通过形如 List<? super Number>来定义,表示类型只能接受Number及其三层父类类型,如 Object 类型的实例。
1
2
3
4
5
6
7
8
9
10
11
12
13
14
15
16
17
18
19
20
21
22
23
24
25
26
27
28
29
30
31
32import java.util.*;
public class GenericTest {
public static void main(String[] args) {
List<String> name = new ArrayList<String>();
List<Integer> age = new ArrayList<Integer>();
List<Number> number = new ArrayList<Number>();
name.add("icon");
age.add(18);
number.add(314);
//getUperNumber(name);//1
getUperNumber(age);//2
getUperNumber(number);//3
}
public static void getData(List<?> data) {
System.out.println("data :" + data.get(0));
}
public static void getUperNumber(List<? extends Number> data) {
System.out.println("data :" + data.get(0));
}
}
/*Output:
data :18
data :314
*/
三、注解
3.1 注解的定义
- 注解(Annotation),也叫元数据。一种代码级别的说明。它是JDK1.5及以后版本引入的一个特性,与类、接口、枚举是在同一个层次。它可以声明在包、类、字段、方法、局部变量、方法参数等的前面,用来对这些元素进行说明,注释。
3.2 注解的作用
- 生成文档。这是最常见的,也是java 最早提供的注解。常用的有@see @param @return 等;
- 在编译时进行格式检查。如@Override放在方法前,如果你这个方法并不是覆盖了超类方法,则编译时就能检查出;
- 跟踪代码依赖性,实现替代配置文件功能。比较常见的是spring 2.5 开始的基于注解配置。作用就是减少配置。现在的框架基本都使用了这种配置来减少配置文件的数量;
- 在反射的 Class, Method, Field 等函数中,有许多于 Annotation 相关的接口。可以在反射中解析并使用 Annotation。
3.3 注解类的写法
1 | public @interface MyTestAnnotation{ |
- 作用在类上
1
2
3
4
5
6
7
public class test{
public static void main(String[] args){
}
}
3.4 元注解
- 元注解:作用在注解上的 注解,方便实现注解想要的功能
- 元注解有五种
1
2
3
4
5@Retention
@Target
@Document
@Inherited
@Repeatable3.4.1 @Retention
- Retention:有保留保持的意思,表示注解存在的阶段是保留在源码(编译期),字节码(类加载),或者运行期(jvm中运行),使用RetentionPolicy来表示注解的保留时期
- 一般使用RetentionPolicy.RUNTIME
1
2
3@Retention(RetentionPolicy.SOURCE) // 尽存在于源码中,class字节码中不存在
@Retention(RetentionPolicy.CLASS) // class字节码文件中存在,运行时无法获得
@Retention(RetentionPolicy.RUNTIME) // 在class字节码文件中存在,运行时可通过反射获得
3.4.2 @Target
- Target:目标的意思,表示设置注解作用的目标范围;通过ElementType表达作用类型
- 一般使用ElementType.TYPE
1
2
3
4
5
6
7
8
9
10@Target(ElementType.TYPE) // 作用于接口、枚举、注解
@Target(ElementType.FIELD) // 作用于属性字段、枚举的常量
@Target(ElementType.METHOD) // 作用于方法
@Target(ElementType.PARAMETER) // 作用于方法参数
@Target(ElementType.CONSTRUCTOR) // 作用于构造函数
@Target(ElementType.LOCAL_VALUABLE) // 作用于局部变量
@Target(ElementType.ANNOTATION_TYPE) // 作用于注解
@Target(ElementType.PACKAGE) // 作用于包
@Target(ElementType.TYPE_PARAMETER) // 作用于类型泛型,及泛型类、泛型方法、泛型接口
@Target(ElementType.TYPE_USE) // 可以标注任意类型,除了class
3.4.3 @Documented
- Document是文档的意思,作用是将注解中的元素包含到Javadoc中去
3.4.4 @Inherited
- Inherited是继承的意思
- 一个被该注解 修饰的类,如果其子类没有被其他注释修饰,则它的子类也继承了父类的注解
- 示例
1
2
3
4
5
6
7
8
9
10
11
12
13
14
15
16
17
18
19
20
21
22
23
24
25
26
27
public MyTestAnnotation{
}
public class Father{
}
public class Son extends Father{
}
public class test{
public static void main(String[] args){
// 获取Son的class对象
Class sonClass = Son.class;
// 获取Son类上的注解MyTestAnnotation
MyTestAnnotation annotation = sonClass.getAnnotation(MyTestAnnotation.class);
}
}3.4.5 @Repeatable
- Repeatable的英文意思是可重复的。顾名思义说明被这个元注解修饰的注解可以同时作用一个对象多次,但是每次作用注解又可以代表不同的含义。
1
2
3
4
5
6
7
8
9
10
11
12
13
14
15
16
17
18
19
20
21
public People {
Game[] value() ;
}
public Game {
String value() default "";
}
public class PlayGame {
} - 通过上面的例子,你可能会有一个疑问,游戏注解中括号的变量是啥,其实这和游戏注解中定义的属性对应。接下来我们继续学习注解的属性。
3.5 注解的属性
- 通过上一小节@Repeatable注解的例子,我们说到注解的属性。注解的属性其实和类中定义的变量有异曲同工之处,只是注解中的变量都是成员变量(属性),并且注解中是没有方法的,只有成员变量,变量名就是使用注解括号中对应的参数名,变量返回值注解括号中对应参数类型。相信这会你应该会对上面的例子有一个更深的认识。而@Repeatable注解中的变量则类型则是对应Annotation(接口)的泛型Class
1 |
|
3.6 注解的本质
- 注解的本质就是一个Annotation接口
1
2
3
4
5
6
7
8public interface Annotation {
boolean equals(Object obj);
int hashCode();
Class<? extends Annotation> annotationType();
} - 通过以上源码,我们知道注解本身就是Annotation接口的子接口,也就是说注解中其实是可以有属性和方法,但是接口中的属性都是static final的,对于注解来说没什么意义,而我们定义接口的方法就相当于注解的属性,也就对应了前面说的为什么注解只有属性成员变量,其实他就是接口的方法,这就是为什么成员变量会有括号,不同于接口我们可以在注解的括号中给成员变量赋值。
3.7 注解属性类型
3.7.1 注解属性类型可以有以下列出的类型
- 基本数据类型
- String
- 枚举类型
- 注解类型
- Class类型
- 以上类型的一维数组类型
3.8 注解成员变量赋值
- 如果注解又多个属性,则可以在注解括号中用“,”号隔开分别给对应的属性赋值,如下例子,注解在父类中赋值属性
1
2
3
4
5
6
7
8
9
10
11
12
public MyTestAnnotation {
String name() default "mao";
int age() default 18;
}
public class Father {
}
3.9 获取注解属性
- 前面我们说了很多注解如何定义,放在哪,现在我们可以开始学习注解属性的提取了,这才是使用注解的关键,获取属性的值才是使用注解的目的。
如果获取注解属性,当然是反射啦,主要有三个基本的方法
1
2
3
4
5
6
7
8
9
10
11
12
13
14public boolean isAnnotationPresent(Class<? extends Annotation> annotationClass) {
return GenericDeclaration.super.isAnnotationPresent(annotationClass);
}
public A getAnnotation(Class annotationClass) {
Objects.requireNonNull(annotationClass);
return (A) annotationData().annotations.get(annotationClass);
}
public Annotation[] getAnnotations() {
return AnnotationParser.toArray(annotationData().annotations);
}下面结合前面的例子,我们来获取一下注解属性,在获取之前我们自定义的注解必须使用元注解@Retention(RetentionPolicy.RUNTIME)
1
2
3
4
5
6
7
8
9
10
11
12
13
14
15
16
17
18
19
20
21
22
23
24
25
26
27
28
29
30
31
32
33
34
35
36
37
38public class test {
public static void main(String[] args) throws NoSuchMethodException {
/**
* 获取类注解属性
*/
Class fatherClass = Father.class;
boolean annotationPresent = fatherClass.isAnnotationPresent(MyTestAnnotation.class);
if(annotationPresent){
MyTestAnnotation annotation = fatherClass.getAnnotation(MyTestAnnotation.class);
System.out.println(annotation.name());
System.out.println(annotation.age());
}
/**
* 获取方法注解属性
*/
try {
Field age = fatherClass.getDeclaredField("age");
boolean annotationPresent1 = age.isAnnotationPresent(Age.class);
if(annotationPresent1){
Age annotation = age.getAnnotation(Age.class);
System.out.println(annotation.value());
}
Method play = PlayGame.class.getDeclaredMethod("play");
if (play!=null){
People annotation2 = play.getAnnotation(People.class);
Game[] value = annotation2.value();
for (Game game : value) {
System.out.println(game.value());
}
}
} catch (NoSuchFieldException e) {
e.printStackTrace();
}
}
}3.9.1 运行结果

3.10 注解的作用
- 提供信息给编译器: 编译器可以利用注解来检测出错误或者警告信息,打印出日志。
- 编译阶段时的处理:软件工具可以用来利用注解信息来自动生成代码、文档或者做其它相应的自动处理。
- 运行时处理: 某些注解可以在程序运行的时候接受代码的提取,自动做相应的操作。
- 正如官方文档的那句话所说,注解能够提供元数据,转账例子中处理获取注解值的过程是我们开发者直接写的注解提取逻辑,处理提取和处理 Annotation 的代码统称为 APT(Annotation Processing Tool)。上面转账例子中的processAnnotationMoney方法就可以理解为APT工具类
四、IO
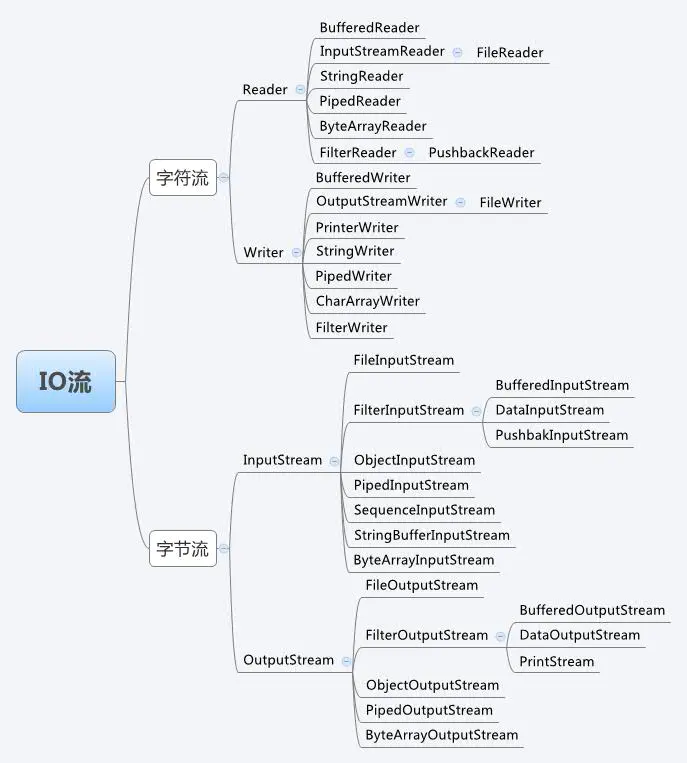
4.1 类结构

- 节点流:可以直接从数据源或目的地读写数据的数据流
- 处理流(包装流):对节点流操作的优化
4.2 操作文件
4.2.1 File类
作用:文件和目录名的抽象表示
四种构造方法
1 | new File(File parent,String child); |
- 获取文件路径方法:
1 | String path=""; //绝对或相对路径,相对路径是相对改项目文件 |
- 获取文件状态方法:
1 | String path=""; |
- 其他操作:
1 | String path=""; |
4.2.2 文件编码
- 编码:字符—>字节
- 解码:字节—>字符
| 字符集 | 说明 |
|---|---|
| ASCII | 英文字符集 |
| ISO-8859-1 | 包含中,日,拉丁字符 |
| UTF-8 | 变长字符集(1-3个字节) |
| UTF-16BE | 定长字符集(2个字节),大端存储 |
| UTF-16LE | 定长字符集(2个字节),小段存储 |
| UTF-16 | 文件开头指定大端表示还是小段表示 |
| GBK | 中文字符集 |
编码函数
1
2
3String msg=""
byte[] data = msg.getBytes(); //默认为项目的编码方式
byte[] data = msg.getBytes("GBK"); //指定编码方式解码函数
1
2
3
4
5
6
7
8
9
10String msg=""
byte[] data = msg.getBytes();
msg = new String(data,0,data.length,"utf-8"); //通过构造器进行解码操作
/*
* 第一个参数是数组引用
* 第二个是解码的起始位置
* 第三个是需要解码的字节数
* 第四个是按照什么方式解码
*/乱码原因
- 给定的字节数不够,第三个参数
- 字符集不符合,第四个参数
五、节点流
5.1 读写操作
- 节点流可以对文件进行读写操作,一般的读写流程如下:
- 创建源
- 选择流
- 操作
- 释放
- 节点流分为字节流和字符流
5.2 字节流
5.2.1 输入流FileInputStream
(1)read函数读取
1 | // TODO Auto-generated method stub |
(2)分段读取
1 | input=new FileInputStream(file); |
5.2.2 输出流
- 写文件分两类
- 覆盖
- 追加
- 注:要注意添加异常操作
1 | // 若进行追加,new FileOutputStream(file,true); |
5.2.3 文件拷贝
- read(flush)返回读取字节的长度
1
2
3
4
5
6// in为我们定义的输入流
byte[] flush=new byte[1024];
int len;
while((len=in.read(flush))!=-1) {
out.write(flush,0,len);
}
5.3 字符流
5.3.1 文件字符输入流FileReader
1 | Reader input=null; |
5.3.2 文件字符输出流FileWriter
1 | Writer output=null; |
五、多线程
5.1 基本概念
5.1.1 程序/进程/线程
- 程序Program
- 进程Process
- 线程Thread
- 并行
- 并发
5.1.2 线程的分类
- 守护线程
- 用户线程
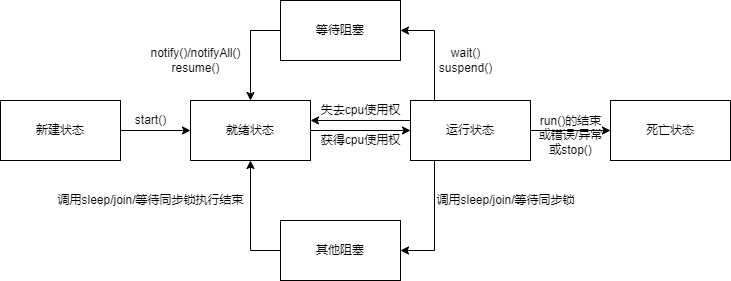
5.1.3 线程的生命周期

5.2 多线程创建方式
5.2.1 方式一:继承Thread类
- 创建一个继承于Thread类的子类
- 重写Thread类的run方法,run()为线程执行的主要流程
- 创建子类对象
- 通过对象调用start()方法启动线程
1 | public class TestThread extends Thread{ |
5.2.2 方式二:创建Thread匿名子类
1 | new Thread(){ |
- Thread类方法
| 方法 | 解释 |
|---|---|
| start() | 启动线程 |
| run() | |
| getName():String | |
| setName() | |
| static currentThread():Thread | 返回当前线程,在Thread子类中就是this,通常用于主线程和Runnable实现类 |
| yield() | 线程让步 |
| join() | 当前线程阻塞,并调用调用此方法的线程,直到线程执行完毕才切换cpu |
| sleep(long millis) | 单位:毫秒 |
| stop() | |
| isAlive() | 判断当前的线程是否处于活动状态,即就绪态和运行态 |
5.2.3 方式三:实现Runnable接口
- 创建一个MyRunnable实现接口的Runnable
- 创建多个Thread线程对象,接收MyRunnable对象作为参数,启动线程调用MyRunnable实现的run方法
- MyRunnable类的中的数据天然的就可以被多个线程共享,而以第一种方式实现多线程的话,则必须将成员变量定义为静态成员变量才能保证多线程的数据共享
1 | class MyRunnable implements Runnable { |
5.2.4 两种方式的选择
- 开发中优先选择实现Runnable接口的方式
- 实现接口的方式没有类的单继承的局限
- 实现接口的方式更适合处理多个线程有共享数据的情况
5.2.5 方式四:实现Callable接口
- 多线程实现方法:继承Callable接口,重写call方法
- call方法有返回值,返回值是一个泛型,并且可以抛出异常
- 我们可以通过futureTask.get()方法获取到线程执行结果,但注意此方法会阻塞主线程执行,知道子线程任务执行完成并返回结果
1 | class MyThread implements Callable { |
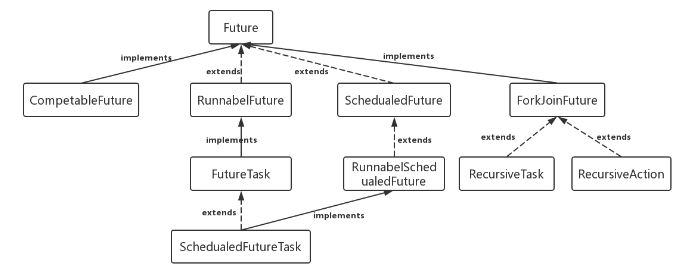
5.2.6 Future接口
在并发编程中,我们经常用到非阻塞的模型,在之前的多线程的三种实现中,不管是继承thread类还是实现runnable接口,都无法保证获取到之前的执行结果。通过实现Callback接口,并用Future可以来接收多线程的执行结果。
举个例子:比如去吃早点时,点了包子和凉菜,包子需要等3分钟,凉菜只需1分钟,如果是串行的一个执行,在吃上早点的时候需要等待4分钟,但是因为你在等包子的时候,可以同时准备凉菜,所以在准备凉菜的过程中,可以同时准备包子,这样只需要等待3分钟。那Future这种模式就是后面这种执行模式。

5.3 线程优先级
5.3.1 线程等级
- MAX_PRIORITY:10
- MIN_PRIORITY:1
- NORM_PRIORITY:5(默认优先级)
- 以上均为Thread类的常量
5.3.2 方法
- getPriority():返回线程优先值
- setPriority(int newPriority):改变线程优先级
5.3.3 说明
- 线程创建时继承父线程的优先级
- 低优先级只是获得调度的概率低,并非一定是在高优先级线程之后才被调用
5.4 线程安全
5.4.1 问题
- 数据被多线程共享时,会存在数据不同步的问题
- 解决办法:同步代码块
5.4.2 方式一:同步代码块
- 同步代码块使用synchronized语句,object对象为线程进入同步代码块所需要的锁,这个锁必须是共用的,否则把锁写进run方法体中,线程仍然是不安全的
- 以上卫生间为例,只用使用了(同步监视器)锁的人把门锁上才能使用卫生间,在此期间,任何人不能使用这间卫生间
- 将操作共享变量的部分放到同步代码块中即可保证线程安全
- 缺点:操作同步代码块时,只能有一个线程,无法完成线程切换,相当于单线程,效率不高
1 | class MyRunnable implements Runnable{ |
5.4.3 方式二:同步方法
- 如果操作共享数据的代码完整的声明在一个方法中,我们可以将此方法声明为同步的
- 在方法的返回类型前加上synchronized即可将此方法声明为同步方法
1 | class MyRunnable implements Runnable{ |
5.5 死锁
5.5.1 概念
死锁是指两个或两个以上的进程在执行过程中,由于竞争资源或者由于彼此通信而造成的一种阻塞的现象,若无外力作用,它们都将无法推进下去。此时称系统处于死锁状态或系统产生了死锁,这些永远在互相等待的进程称为死锁进程。
5.5.2 死锁模拟
- 主线程===>init()===>同步监视器A===>同步监视器B===>last()方法
- 副线程===>init()===>同步监视器B===>同步监视器A===>last()方法
1 | class A{ |
5.5.3 Lock锁
Lock是jdk5.0新增的特性
synchronized和lock的异同
- 相同:二者都可以解决线程安全问题
- 不同:synchronized机制在执行完相应的同步代码之后,自动的释放同步监视器,Lock需要手动的启动同步(lock()),同时结束同步也需要手动实现(unlock())
- 优先使用顺序:Lock->同步代码块(已经进入方法体,分配了相应资源)->同步方法(在方法体之外)
1 | class MyRunnable implements Runnable{ |
5.6 线程池
- 背景:经常创建和销毁、使用量特别大的资源,比如并发情况下的线程对性能影响很大
- 思路:提前创建好多个线程,放入线程池中,使用时直接获取,使用完放回池中。可以避免频繁创建销毁、实现重复利用;类似于共享单车
- 好处:提高相应速度(减少了创建新线程的时间);降低资源消耗;便于线程管理:corePoolSize(核心池的大小)、maximumPoolSize(最大线程数)、keepAliveTime(线程没有任务时最长的保持时间)
- JDK5提供了线程池API:ExecutorService和Executors
- ExecutorService:真正的线程池接口,常见子类ThreadPoolExecutor
- void execute(Runnable command):执行任务/命令,一般用来执行Runnable
<T> Future <T> submit(Callable<T> task):执行任务,有返回值,一般用来执行Callable- void shutdown():关闭连接池
- Executors:工具类、线程池的工厂类,用于创建并返回不同类型的线程池
- Executors.newCacheThreadPool():创建一个可以缓存的线程池,如果线程池长度超过处理需要,可以灵活回收空闲线程,没回收的话就新建线程
- Executors.newFixedThreadPool(n):创建一个可重用固定线程数的线程池,可控制最大并发数,超出的线程进行队列等待。
- Executors.newSingleThreadExecutor():创建一个单线程池,它只会用唯一的工作线程来执行任务,保证所有任务按照指定顺序(FIFO, LIFO, 优先级)执行
- Executors.newScheduledThreadPool(n):创建一个线程池,它可安排在给定延迟后运行命令或者定期地执行
1 | class MyThread implements Runnable { |